Did you know Americans lose up to 32 hours a month looking for misplaced tools? That’s almost like losing an entire week’s work to mess! Keeping your tools sorted is crucial. Making a magnetic tool board is a great DIY project. It cleans up your space and makes tools easy to find. This guide will show you how to create one with things you probably have at home. Follow along and see how DIY tool organization can redo your workshop or garage!
Introduction to Magnetic Tool Boards
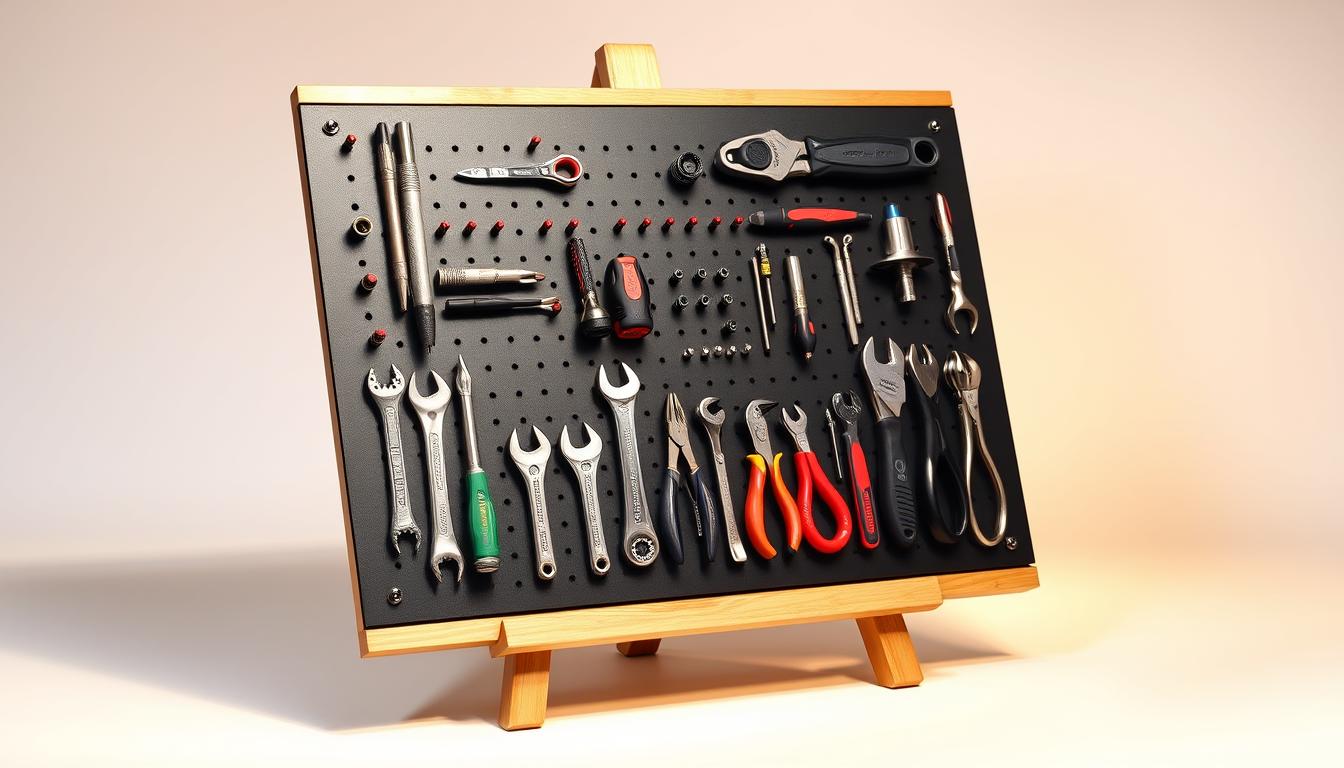
A magnetic tool board makes organizing tools in any space neat and efficient. It uses a magnetic holder to securely hold various tools, keeping them in sight. This quadro organizador de ferramentas helps create a tidy area so everything stays in its right place.
What is a Magnetic Tool Board?
It’s a wall-mounted panel with strong magnets. You can stick tools onto it and pull them off easily. This setup lets you get to your tools fast, saving time you’d lose digging through cluttered spaces.
Benefits of Using a Tool Board
Having a magnetic tool rack means your tools are always visible and arranged. This setup makes it easier to take care of your tools and you won’t lose them as much. It also cuts down on mess, which is great for small work areas where being orderly boosts how much you get done.
Moreover, a neat tool board adds a touch of style to your space. It combines keeping things tidy with looking good.
Materials Needed for Your Project
To make a magnetic tool board, you need certain things. Plus, you can add some optional touches to make it even better. Gather everything listed to make sure your tool board works well and looks great.
Common Materials for DIY
You’ll need these items to build your magnetic tool holder:
- Wooden board (pine or plywood are popular choices)
- Sheet of metal or a magnetic board
- Hooks or magnetic strips for hanging tools
- Screws to secure components
- Drill for making holes and assembling pieces
Optional Enhancements
If you want to make your project unique, try these ideas:
- Paint the board for a pop of color
- Use pegboard for additional versatility
- Add brackets or shelves for storing other items
Step-by-Step Guide: Constructing Your Magnetic Tool Board
Making your own DIY magnetic tool board can be rewarding and useful. Just follow these steps for an easy process in building a magnetic tool holder that meets your needs.
Preparing Your Workspace
First, clear out your workspace to make it neat and efficient. Make sure you have all your materials and tools close. A clean area helps you focus better and keeps you from getting distracted while working.
Cutting the Wood Pieces
Measure and cut your wooden board to your preferred size with a jigsaw or handsaw. It’s important to cut the wood precisely; it impacts how your magnetic tool board looks and works. So, take your time to measure and cut with accuracy.
Assembling the Board
To put it together, fix the magnetic sheets or metal board firmly on the wood with screws and brackets. This step makes sure everything stays tightly in place. A well-built board will last longer and work better, giving you a dependable place to store your tools.
Choosing the Right Design for Your Board
When picking the best magnetic tool board designs, think about your workspace and style. A good design improves functionality and adds character to your work area.
Flat vs. Adjustable Designs
Flat designs are simple and stable, great for those who value simplicity. They fit well against walls and are easy to set up. In contrast, adjustable designs let you change heights to suit different tasks or preferences. This flexibility is useful in shared spaces with various user needs.
Aesthetic Considerations
Creating a magnetic tool board that shows your style is rewarding. The quadro para ferramentas com imã is not just for organizing tools, but also acts as decor. Adding colors that match your decor or custom decals personalizes your board. It transforms it from just useful to a statement piece in your workspace.

| Design Type | Benefits | Considerations |
|---|---|---|
| Flat Design | Stable and space-efficient | Less flexibility in usage |
| Adjustable Design | Flexible heights for various tasks | May require more space for adjustment |
| Aesthetic Customizations | Reflects personal style and enhances visual appeal | May require additional materials and time |
Choosing your board’s design and looks carefully lets you make a space that’s both useful and welcoming. It becomes a true reflection of you.
Finishing Touches for Your Tool Board
Putting together your magnetic tool board is a big accomplishment. It’s about making it work well and look good too. Smooth edges and a nice finish can make it stand out.
Sanding and Smoothing Edges
Sanding the edges is important to avoid splinters. Use medium, then fine sandpaper for a smooth touch. This makes the board safe and good-looking.
Painting or Staining Options
Picking a paint or stain color is fun. Use products meant for wood to protect it and show off its beauty. Adding a sealant after painting or staining makes it last longer and look great.
| Finish Type | Benefits | Durability |
|---|---|---|
| Paint | Variety of colors, easy application | Moderate, may chip over time |
| Wood Stain | Enhances natural grain, rich colors | Good, seeps into wood fibers |
| Sealant | Protects surface from scratches | Excellent, adds long-lasting protection |
Safety Tips During Construction
It’s crucial to take proper safety steps when doing construction. These actions keep you safe and make building stuff more fun. Follow these tips for better safety in your workshop.
Essential Safety Gear
Before you start building, make sure you have the right safety gear. You will need:
- Safety goggles to shield your eyes from debris.
- A dust mask to protect against inhaling fine particles.
- Hearing protection when using loud power tools.
- Sturdy gloves to safeguard your hands.
Using this safety gear is key for staying safe in the workshop. It greatly cuts down on the chance of getting hurt.
Working with Tools Safely
Handling tools correctly is very important for safety. Keep these practices in mind:
- Always read and follow the manufacturer’s instructions for tools.
- Check that tools are in good working condition before use.
- Keep your workspace organized to minimize tripping hazards.
- Disconnect power tools when not in use and when changing bits or blades.
Keeping your work area clean and safe is crucial for avoiding accidents. Adopting these safety steps makes for a safer DIY space.

| Safety Gear | Purpose |
|---|---|
| Safety Goggles | Protects eyes from debris |
| Dust Mask | Prevents inhaling particles |
| Hearing Protection | Reduces noise exposure |
| Sturdy Gloves | Safeguards hands from injuries |
Creative Ways to Personalize Your Tool Board
Adding your own touch to a magnetic tool board gives it special flair. It shows off your style and makes it more useful. There are lots of ways to do this, making your board look great and fit your workshop’s look.
Adding Engravings
Putting names, quotes, or messages on your board makes it more personal. This can make your workspace more lively and inspiring. You could use a laser for neat results or hand tools for a rustic feel. Customizing this way keeps you motivated and your tools in reach.
Decorative Elements
Using decorations makes your tool storage even cooler. Things like stickers or paint make your board stand out. Choose bright colors or designs to match your workshop’s style. These artistic details arrange and beautify your space.
Troubleshooting Common Issues
When setting up your magnetic tool board, you might face some usual problems. Quickly fixing these issues can make organizing your tools easier. Here are a few common problems and how to solve them.
Adjusting Tool Placement
Are your tools falling off the board? It might be the magnets. Try moving the magnets around to get a better hold.
Think about the weight of each tool. A heavy tool needs a strong magnet. Try different setups to see what works best.
Securing Loose Magnetic Strips
Loose strips can mess up your workspace. To fix magnetic tool boards, use more glue or screws to keep strips in place. Check the strips often to keep your tools secure.
Care and Maintenance of Your Magnetic Tool Board
It’s important to keep your magnetic tool board in top shape. Doing so ensures it lasts longer and works well. Here are tips for cleaning and caring for your tool board.
Cleaning Tips
Clean your board regularly to keep dust and debris away. This helps magnets stick better. Wipe it down with a damp cloth, paying extra attention to areas that hold tools often. Use a mild cleaner if necessary.
Long-term Care
Looking after your magnetic tool rack is about cleaning and checking it. Make sure the magnets and hooks are secure and work right. Replace any worn-out parts fast. This keeps your tool board working well for a long time.
Alternative Designs to Consider
When looking for a magnetic tool board, think about designs that boost functionality and convenience. Portable magnetic boards are great since you can move them easily. They also have multifunctional organizers to make your space more efficient and tidy.
Portable Versions
Portable magnetic boards have lots of benefits. They’re light and easy to carry to different places. With features like hooks and magnetic strips, they’re very versatile. Having a portable board means your tools are handy, whether you’re at home or far away.
Multi-Purpose Boards
A multi-purpose board brings new ways to organize your area. You can use them as notice boards for key reminders or inspiration while keeping your tools visible. They also have spots for smaller tools, making it easy to keep things organized. Such boards not only look good but also help you work better.
| Feature | Portable Magnetic Tool Boards | Multi-Purpose Boards |
|---|---|---|
| Flexibility | High | Moderate |
| Tool Organization | Efficient | Very Efficient |
| Multi-functionality | Low | High |
| Transportability | Very High | Moderate |
| Set-Up Time | Quick | May Vary |
Choosing portable magnetic boards or multi-purpose ones helps tailor your workspace to your needs. It also boosts your area’s overall efficiency.
Conclusion: Enjoying Your Handmade Magnetic Tool Board
Your magnetic tool board is now ready, and it’s time to enjoy it. It makes your tools easy to see and grab, boosting your project efficiency. Keep your tools organized and rearrange them to fit your work style.
Recommended Tips for Use
Embrace your style by adding personal touches to your tool board. This makes it not only useful but fun to use. Sharing your journey with loved ones may inspire them to start their DIY projects. Your passion can motivate others to get creative too.
Encouraging Others to Try
Showing off your project can inspire other DIY enthusiasts. Talk about your experiences and the benefits of your magnetic tool board. This way, you can help build a community that loves crafting and innovation.