Did you know the U.S. makes over 70 million tons of wood waste yearly? By making a wall coat rack from reclaimed wood, you reuse materials and help the environment. This guide will teach you to make a stylish and useful cabideiro de parede com madeira reaproveitada. It will look great in your entryway and be good for the planet.
Reclaimed wood adds special charm to your home. Each piece tells a story. Let’s explore how to make sustainable wooden wall hangers and discover their potential!
Benefits of Using Reclaimed Wood for Projects
Using reclaimed wood for something like a handmade coat rack has many benefits. It is good for the planet and adds unique beauty and cost savings.
Eco-Friendly Choice
Making a coat hanger from recycled wood lowers the need for new wood. This helps save wood from going to landfills. It makes us think about using materials more wisely.
Unique Aesthetic
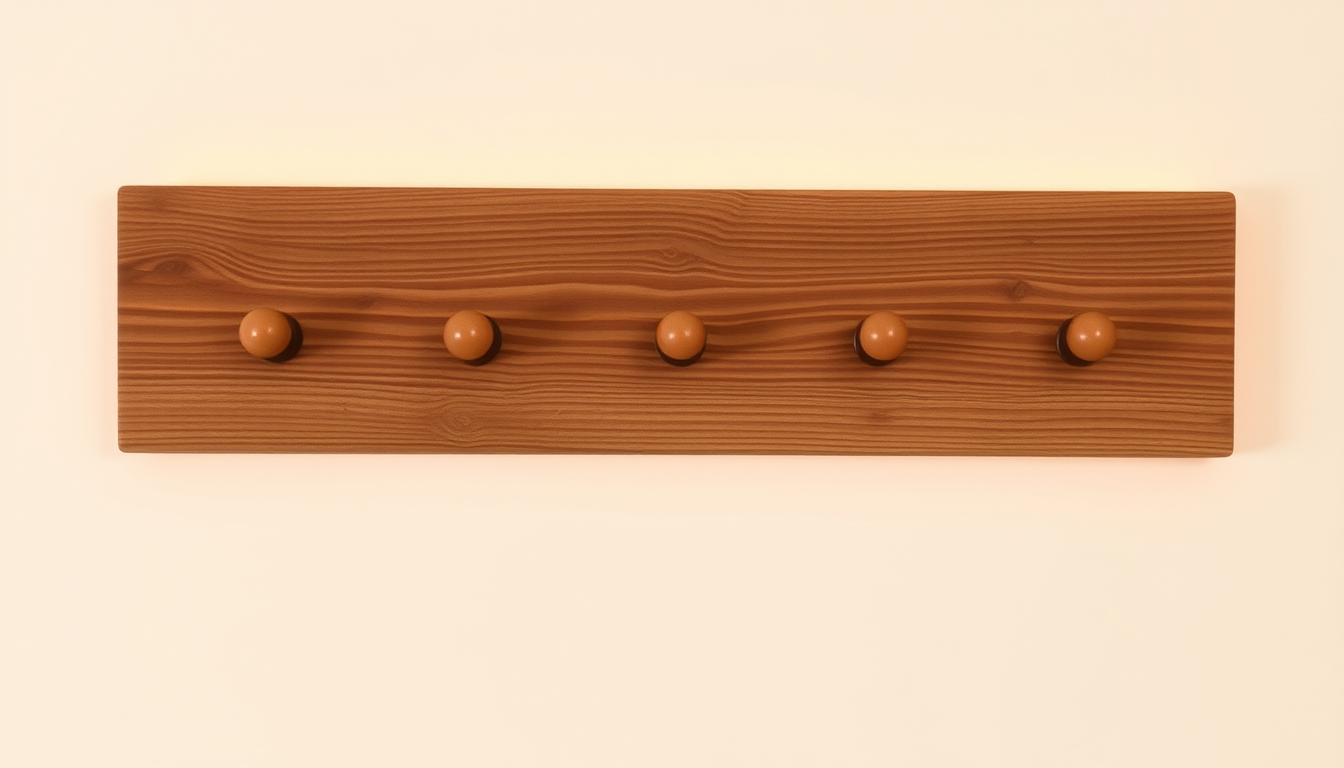
A coat rack from reclaimed wood has unique textures and patterns. It turns a simple coat stand into an eye-catching piece in your home. Every coat rack is one-of-a-kind, showing off your unique style.
Cost-Effective Solutions
Choosing reclaimed wood can save money compared to new materials. DIY fans find great value in using reclaimed materials. Your handmade coat rack will look amazing and won’t cost a lot.
Materials Needed for Your Wall Coat Rack
Starting a wall coat rack project means picking the right materials first. Reclaimed wood is perfect for adding a special touch. Make sure you have all the necessary tools. You might also want to think about special decorations to make your rack unique.
Types of Reclaimed Wood
There are many kinds of reclaimed wood, each with a different look. Let’s talk about a few:
- Pallet Wood: It’s not hard to find and is great for a rustic style.
- Barn Wood: Offers a piece of history and lots of character.
- Urban Wood: Comes from city trees, and it tells a unique story.
Essential Tools for the Job
Having the right tools is important for a successful project. Here’s what you’ll need:
- Saw: To cut the wood to the sizes you want.
- Drill: You’ll need this to make holes for screws and hooks.
- Sander: For smoothing the wood so it looks nice and clean.
Optional Decorative Elements
You can make your rack look even better with some customization. Here are some ideas:
- Hooks: Choose a rustic hook that matches the reclaimed wood.
- Stains or Paints: Highlight the wood’s beauty or add color.
- Embellishments: Adding special touches can make your rack stand out.
Measuring and Planning Your Design
To start a successful wall coat rack project, you need good measuring and planning. Pick a spot in your home that is easy to see and reach. Think about placing it near doors or hallways. That way, it won’t get in the way but still be very useful. Make sure you know how much wall space you have to choose the best place.
Choosing the Right Location
Choosing where to put your coat rack involves looking at both its use and look. Find a place that’s easy to get to and looks good with your home’s style. Think about how tall it is and how close it is to other furniture, as this affects how well it works. Picking an eco-friendly option is even better when it fits nicely with what you already have.
Sketching Your Design
It helps to draw your plan before starting. On your sketch, include how many hooks you want and where to place the wood pieces. Make sure your design values each piece of reclaimed wood’s uniqueness and matches your own taste. Don’t forget to add any extra shelves or special touches that make it more useful.
Determining the Size and Dimensions
Knowing the right size for your coat rack is key. Measure where you want to put it and adjust your design to fit. Think about what you will hang on it, like coats or bags. This helps in making something that looks good and works well. A coat rack that’s the perfect size shows off the reclaimed wood’s beauty even more.
Preparing the Wood
Getting your reclaimed wood ready is crucial for a sturdy, attractive rustic wall hook. This stage involves cleaning, smoothing, and protecting the timber. These steps are vital before you begin assembling your eco-friendly coat hanger.
Cleaning and Sanding
Start by cleaning the wood to remove dirt, dust, and old finishes. Use warm water and mild soap to get rid of tough grime. After cleaning, make sure the wood is completely dry.
Then, sand the wood to make it smooth. This prevents splinters and makes it look better. Use both coarse and fine sandpaper for top-notch results.
Treating for Pests
It’s essential to treat the wood for pests next. Use a pest control solution designed for wood to ensure its durability. This step keeps your coat hanger safe from future damage.
Sealing and Finishing
Seal and finish the wood to protect it and highlight its natural beauty. You can choose from oils, varnishes, or eco-friendly finishes. Each choice brings out the wood grain and guards against moisture. Pick a finish that boosts your project’s rustic charm and enjoy the beautiful outcome.

Cutting the Wood to Size
Cutting wood accurately is key for a DIY coat rack. It’s important to be safe and precise. Knowing the best way to cut different woods helps a lot. Smooth edges make your eco-friendly hanger look great.
Safety Precautions
Safety comes first when you start cutting. Always use goggles and gloves. Keep your work area neat and power cords out of the way. Check your tools before you start. Pay attention to what’s around you when cutting.
Best Techniques for Cutting
Each wood type might need its own way of cutting. A circular saw works well for straight cuts. Use a jigsaw for curved shapes. A miter saw is best for exact angles. Take your time to cut accurately.
Achieving Clean Edges
Clean edges make your hanger look professional. Sand the edges smooth after cutting. Start with a medium grit and finish with a finer one. This makes the wood smooth and helps in assembling your project.
Assembling the Rack Components
Starting to build your wall coat rack with reclaimed wood is an exciting step. You’ll arrange the wood pieces for a stable, good-looking design. The way you put it together makes it work well and look great.
Arranging the Wood Pieces
First, spread out the wood on a flat area. This helps you see how your coat stand will look. Make sure to place the longer pieces as your main supports. Check for any parts that might not look right before joining them.
Types of Joinery Techniques
To make a strong rack, think about how the wood pieces will connect. Butt joints make a flush connection, while lap joints overlap for more strength. Lap joints are better for a sturdy wall coat rack.
Securing with Screws or Glue
Securing the pieces is the last step. Wood screws give your rack strong support. Adding wood glue before screwing makes the bond even stronger. This way, your coat stand can handle daily use without problems.
Installing the Wall Coat Rack
Installing your eco-friendly wall-mounted coat rack correctly makes it safe and functional. It starts with choosing the right wall anchors for your wall type. With proper tools and methods, you’ll firmly attach your reclaimed timber rack.
Required Wall Anchors
Each wall type needs its own anchors for stability and strength. Below is a list of anchors suited for different surfaces:
| Wall Type | Recommended Wall Anchor | Load Capacity |
|---|---|---|
| Drywall | Toggle Bolts | Up to 50 lbs |
| Brick | Masonry Screws | Up to 100 lbs |
| Plaster | Expansion Anchors | Up to 30 lbs |
| Concrete | Concrete Anchors | Up to 150 lbs |
Step-by-Step Installation Guide
To put up your coat rack, just follow these steps:
- Decide on the perfect height for your rack and mark it.
- Check the marks with a level to make sure they’re straight.
- Drill holes that match the anchor’s size you’re using.
- Put the anchors into the holes as directed in the instructions.
- Place the coat rack against the anchors and screw it in tight.
- Make sure everything is aligned properly and adjust if needed.
Adding Hooks and Decorative Features
When you upcycle wood to make a coat rack, it’s not just about function. The right hooks can make it more useful and stylish. We’re going to look at different hooks to find the perfect ones for your project.
Types of Hooks to Consider
- Wall-Mounted Hooks: Great for heavy coats, they offer stability.
- Coat and Hat Hooks: These are good for various items, blending style and use.
- Magnetic Hooks: Ideal for light things and can be moved easily.
- Decorative Hooks: They make your coat rack look better.
Finishing Touches with Stain or Paint
Stain or paint protects your coat rack and lets you choose its final look. Think about your room’s style when picking a color. Natural stains show off the wood, while bright paints bring color. Always pick something eco-friendly to stay green and stylish.

Maintenance Tips for Your Wall Coat Rack
To keep your eco-conscious wall-mounted coat rack in top shape, regular upkeep is a must. These tips will help ensure it remains clean, strong, and looking good. They boost both its looks and usefulness.
Cleaning and Care
Dust your wall coat rack often with a soft cloth to stop dirt and grime from building up. For a deeper clean, use a damp cloth and gentle soap. Stay away from harsh cleaners that could hurt the wood. After cleaning, dry it well to avoid water damage. This keeps your eco-friendly coat rack in great shape.
Inspecting for Wear and Tear
Check your coat rack regularly for issues like loose hooks or squeaky wood. Fixing screws and swapping out broken hooks will stop more damage. Having a regular check-up routine keeps it safe and lengthens its lifespan. Fixing small problems quickly will help your eco-friendly coat rack last longer.
Creative Variations of Wall Coat Racks
The design possibilities for wall coat racks are endless. Going beyond the ordinary lets you add both beauty and function to your home. Designs that do more than hold coats can solve storage problems too. A wall-mounted coat stand made from reclaimed wood can be a bold focus. It holds coats, hats, and bags well.
Multi-Purpose Designs
Think about adding features for different uses. A coat rack that also holds shoes can keep your entryway tidy. Adding a bench or seats near your coat rack makes it easy to put on shoes or drop off bags. This saves floor space and makes your design do more.
Incorporating Shelves or Baskets
By adding shelves or baskets, your coat rack can hold more, like gloves or scarves. Keeping everything in one spot cuts clutter and helps you stay organized. A little creativity turns your coat rack into a full storage solution, mixing fun with function.
Upcycling Old Furniture as Coat Racks
For a unique touch, turn old furniture into coat racks. Use an old ladder, window frame, or door to make special coat stands. This recycles forgotten pieces and supports a green lifestyle. Getting creative with coat racks shows your style and cares for the planet.