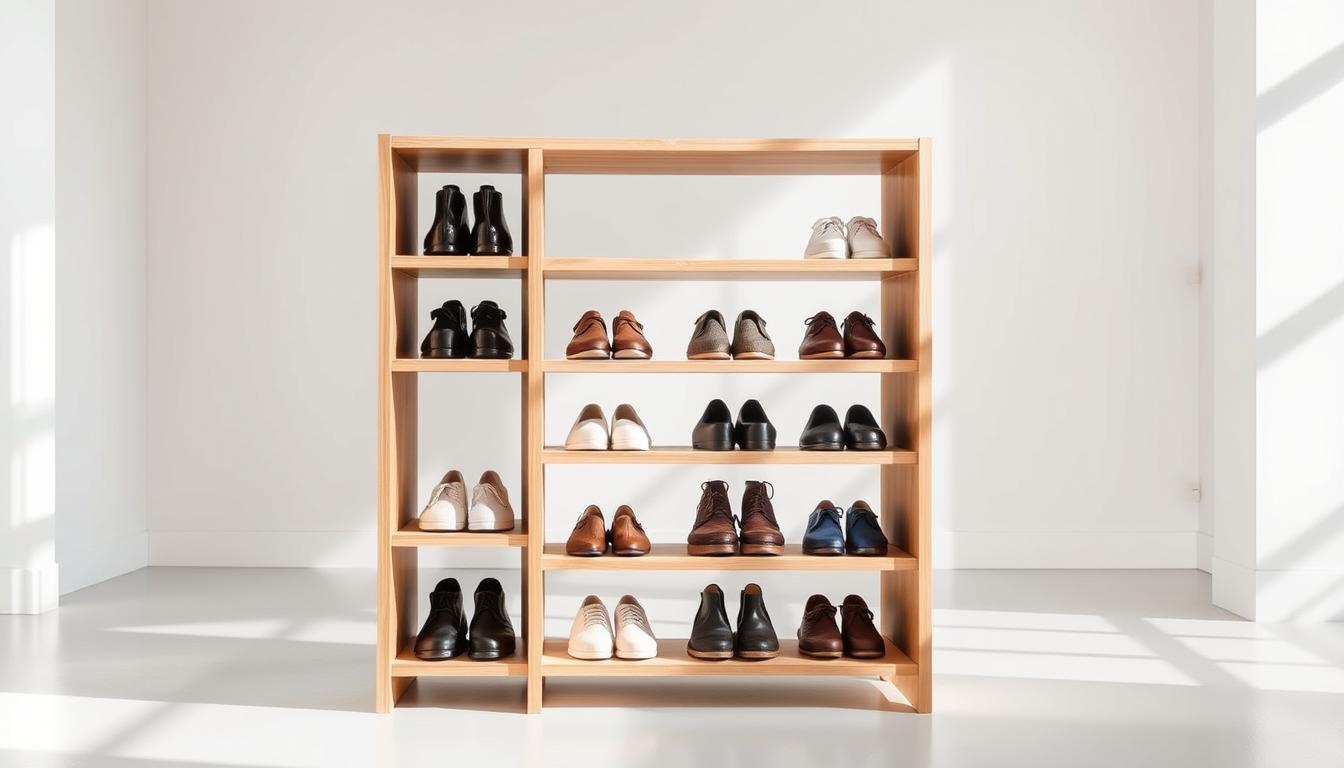
An average American home has almost 30 pairs of shoes. That’s a big demand for organization! A screwless shoe rack helps those short on space. It not only arranges your shoes neatly but also brings an easy, no-tool setting for any area.
We’ll show you how to create a sapateira compacta sem parafusos that’s both smart and chic. By following this guide, you’ll craft a shoe stand. It will make your space look better and keep your footwear in order. Get ready for an exciting DIY project!
What is a Screwless Compact Shoe Rack?
A screwless compact shoe rack is a modern way to keep shoes tidy without using screws. It uses smart design, like interlocking parts, for stability. This look is sleek and can fit in any space nicely.
Understanding the Concept
These shoe racks are all about creative building. They stay strong through special joins, giving a cool vibe. Their design fits well in most rooms, making things look neat. Putting one together is easy and doesn’t need special tools or skills.
Benefits of a Screwless Design
Screwless shoe racks offer more than just good looks. Here are some key benefits:
- Minimalist shoe storage: They help make spaces look tidy, improving your home’s vibe.
- Ease of assembly: Setting up is quick and easy, letting you get right to organizing.
- Customization: You can make it your own with different wood finishes and styles.
Materials Needed for Your Project
Making a compact shoe shelf or a simple shoe cabinet needs certain materials and tools. Knowing what wood and tools you need makes your DIY project easier. Optional accessories add a nice touch too.
Recommended Wood Types
Choosing the best wood is key for how long it will last and how it looks. Consider these options:
- MDF (Medium Density Fiberboard): It’s cheap and easy to use. Many people who want to save money choose it.
- Plywood: Known for being strong and not bending out of shape. It’s great for projects you want to keep around for a while.
- Solid Wood: It looks nice and lasts a long time. It costs more, but it’s worth it for its beauty and durability.
Tools to Have on Hand
The right tools make building your shoe cabinet easier and improve its quality. Make sure to have these:
- Saw: You’ll need this to cut the wood correctly.
- Tape Measure: For making sure your cabinet fits just right.
- Mallet: Helps put things together without breaking them.
- Clamps: Keep everything tight while the glue dries.
Optional Accessories for Customization
Adding your own touch to the shoe shelf can make it stand out. Think about adding these:
- Decorative Knobs: They look good and make opening the cabinet easier.
- Stencils: For adding cool designs that show off your style.
Planning Your Shoe Rack Design
Designing a modern shoe rack is an exciting task that can improve your area. It’s key to carefully plan to make sure your shoe rack is both useful and looks good. Begin by measuring the space where it’ll go.
Measuring Your Space
Taking accurate measurements of the space helps avoid making it too crowded. Check the height, width, and depth to ensure your shoe rack fits well in your room.
Sketching Your Design
After measuring, draw a sketch of your design. This helps you see how the shoe rack will look in your space. It’s important for it to match your furniture and reflect your style.
Choosing Storage Capacity
Think about how many shoes you want to store. This will affect your rack’s design and how many shelves it has. Your decision will determine the rack’s size and how many levels it needs.
Step-by-Step Instructions
Making a simple shoe rack can be a fun project that improves your space. Follow these steps to create a shoe cabinet without screws. This method ensures a strong and beautiful result.
Cutting the Wood Pieces
First, measure your space. Then, carefully cut the wood pieces with a saw based on those measurements. Getting the size right is crucial for a perfect fit in your shoe rack. Be precise and patient to prevent mistakes that could mess up the assembly.
Assembling the Frame
With your wood pieces ready, start putting the frame together. Use locking joins or dowels to make it sturdy. This way, you don’t need screws, which simplifies the process. Many people find this step easy to do by themselves, thanks to these easy methods.
Adding Shelves Without Screws
To add shelves, make slots or grooves in the frame. This method keeps your rack hardware-free and looks clean. Make sure the shelves fit tightly. This will ensure they are strong and easy to use in your cabinet.

Tips for Stabilizing Your Shoe Rack
Making a sturdy, space-saving shoe organizer requires the right design and stability enhancers. You should think about adding extra support and using strong adhesives. These steps make sure your shoe rack stays steady and useful.
Additional Support Ideas
Add corner brackets or L-brackets to your shoe rack for more strength. These parts make it more stable without needing screws. With these brackets, your shoe organizer can hold more weight and won’t wobble.
Using Adhesives and Brackets
Strong adhesives are great for sticking wood joints together. They form a lasting bond without screws, keeping your shoe rack stable. Choose a wood-specific glue for the best results in safety and durability.
| Support Method | Description | Benefits |
|---|---|---|
| Corner Brackets | Small metal supports placed at corners | Adds stability, easy installation |
| L-Brackets | Right-angled brackets for horizontal and vertical support | Enhances strength, no screws needed |
| Wood Adhesive | Specialized glue for secure joints | Creates strong bonds, maintains appearance |
Finishing Touches for Aesthetic Appeal
Adding the right touches to a shoe rack can make it more than just useful. These extras can turn your project into a lovely part of your house. Think about how painting or staining can give your shoe rack its own style. Also, adding pretty details can make it more interesting to look at.
Painting or Staining Options
The finish you choose for your shoe rack changes how it looks. You can use clear stains that show the wood’s natural look or bright colors to match your room. Think about how the color fits with everything else around it. Here are some choices:
- Clear Stain: Keeps the wood’s natural beauty while protecting it.
- Matte Paint: Gives a modern, soft feel.
- Semi-Gloss Finish: Is durable and slightly shiny.
- Bold Colors: Adds fun and makes a statement.
Adding Decorative Features
You can make your shoe rack a key point in a room by decorating it. Think about using wood carvings, stencils, or painted designs. These details do more than catch the eye—they show off your style. Check out these ideas:
- Wood Carvings: Elegant patterns can add a classy touch.
- Stenciled Designs: Put on patterns or images you love.
- Colored Trim: Makes the shelves pop with a fun edge.
By carefully choosing how to paint or stain and decorate, your shoe rack will not just store your shoes. It will also be a beautiful part of your home’s design.
Maintenance for Longevity
Keeping your screwless compact shoe rack in great shape is key. Regular care helps it last longer and work better. Cleaning it well also keeps it looking good and strong.
Cleaning Tips
Cleaning is easy. Just wipe it with a damp cloth often. This stops dirt from damaging the surface. Avoid strong chemicals to not hurt the wood. Natural cleaners are best for a clean shoe rack.
Preventing Wear and Tear
Make sure each shelf carries weight evenly to prevent damage. Too much stuff can make shelves bend and weaken the rack. Check shelves often for damage and fix it to keep the rack good for years.
| Maintenance Task | Frequency | Recommended Method |
|---|---|---|
| Wipe surfaces | Weekly | Damp cloth |
| Inspect weight distribution | Monthly | Visual check |
| Use protective finish | Every 6 months | Natural oil or wax |
Creative Variations of Shoe Racks
Exploring creative shoe rack designs can change any entryway for the better. Using multi-functional designs helps use space well and adds functionality. It’s key to mix beauty with usefulness in a tidy home.
Multi-functional Designs
Multi-functional designs are great for more than just shoes. For example, a shoe rack that also works as a display shelf makes your entryway stand out. It also gives storage. These designs are versatile, fitting different needs and likes.
Incorporating Benches or Seating
Adding a bench to your shoe rack makes storage seamless. A bench offers a spot to sit when putting on or taking off shoes. Plus, hooks for bags and umbrellas turn your rack into a complete entryway helper. This makes your space work better and look nice.

FAQs About Screwless Shoe Racks
Starting your DIY shoe rack project comes with questions and concerns. Getting answers to these questions can make things clearer. This clarity and advice from experts can make your project better.
Common Concerns Addressed
Many worry if screwless shoe racks will hold up and carry all your shoes. Making sure your rack is strong and can hold your shoes is key. Using good materials and putting it together right can help a lot.
Tips from Experienced DIYers
Experienced DIYers recommend starting small to get better. This lets you build your skills slowly. Then, you can try bigger projects.
Conclusion: Enjoy Your Custom Shoe Rack!
You’ve made your screwless compact shoe rack. Now, take a moment to look at what you’ve done. Your effort and creativity are clear in this useful piece. It shows off your DIY skills. Be proud of what you’ve built as you make your space tidy and stylish.
Celebrating Your Achievement
Your new shoe rack will impress your friends and family. Invite them to see your work and learn about how you made it. This can inspire them and you to start more DIY projects. It shows your success and encourages everyone to try their hand at something new.
Encouraging Future DIY Projects
Enjoying your shoe rack? Think about trying more DIY projects. There’s a big world of resources and support out there. Check out online forums, social media, or local workshops to grow your skills. Use this chance to keep building and creating more wonders!